Add Row
Add Element
HOME SERVICE HUB
Add Element
  • Home
  • Categories
    • Smart Home Solutions
    • Gardening
    • Landscaping
    • Home Exterior
    • Outdoor Living
    • Smart Homes
    • Lawncare
    • Lighting Solutions
    • Plumbing Tips
  • Featured Business Profiles
Add Row
Add Element
June 28.2025
3 Minutes Read

Enhance Your Garden with Purple Sprouting Broccoli: A Must-Grow Delight

Close-up of purple sprouting broccoli in a garden.

Why Grow Purple Sprouting Broccoli?

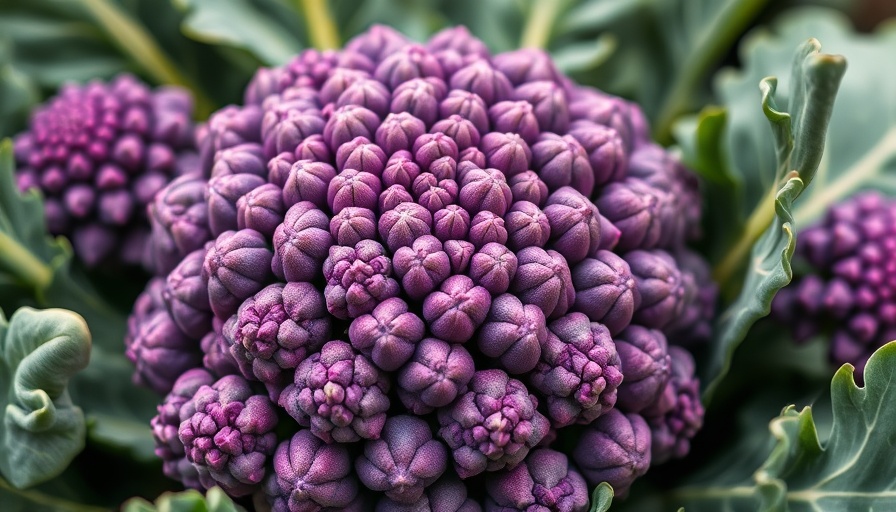
Purple sprouting broccoli isn’t just a beautiful addition to your garden; it’s a flavorful and nutritious vegetable that thrives in cooler weather. Known for its unique purple hue and tender texture, this broccoli variety grows multiple side shoots instead of a single head, offering a fresh take on traditional broccoli. It’s an ideal option for gardeners looking to diversify their harvest.

Understanding the Unique Growth Cycle

This unique vegetable requires specific growth conditions to truly flourish. Unlike standard broccoli, purple sprouting broccoli demands a vernalization period — 6 to 8 weeks of temperatures below 50°F. This exposure conditions the plant to produce shoots rather than just leaves; hence, successful growers usually reside in climates where winter lows hover between 15°F and 40°F. Understanding this growth requirement is crucial to achieve a successful harvest.

The Perfect Planting Timing

The best time to plant purple sprouting broccoli is in the late summer or early fall. This timing allows the plants to become established before the onset of frost, thus making full use of the cool growing season. Harvest typically occurs from late February to April, just in time when other fresh produce may be sparse. By incorporating this vegetable into your gardening schedule, you can extend your harvest season.

Benefits of Growing Purple Sprouting Broccoli

Beyond the aesthetic appeal and unique taste, purple sprouting broccoli boasts impressive health benefits. Rich in anthocyanins, this antioxidant-rich vegetable supports immune health and may even enhance cognitive function. Adding this versatile broccoli to your diet is easy — enjoy it raw in salads, lightly steamed, or sautéed as a colorful side dish.

Simple Steps to Cultivate this Broccoli

Growing purple sprouting broccoli is straightforward, yet requires attention to detail. Here’s how to ensure you reap a bountiful harvest:

  • Soil: Well-draining, nutrient-rich soil is essential. Amend with compost for the best results.
  • Spacing: Provide ample space between plants to encourage air circulation and proper growth.
  • Watering: Keep the soil consistently moist but not soggy. Regular watering will promote robust growth.
  • Fertilization: Use a balanced fertilizer to support healthy plant development throughout the growing season.

Harvesting Tips for the Best Flavor

To achieve the best flavor, begin harvesting the central head first when it reaches about 3 to 5 inches in diameter. Once the head is cut, the plant will produce additional side shoots that can be harvested over several weeks. It’s best to enjoy the florets fresh to appreciate their unique colors and flavors; however, cooking does turn them green — slightly diminishing their vibrant hue, but not their taste!

Conclusion: Transform Your Garden with Purple Sprouting Broccoli

Growing purple sprouting broccoli can bring numerous benefits to your garden and table. With its nutritional advantages, visual appeal, and suitability for cooler climates, it's the perfect vegetable for anyone wanting to bolster their home garden. Start planning for this exceptional crop today; you won’t regret the flavors and variety it brings.

If you’re ready to dig your hands into the soil and enrich your diet, why not start your journey with purple sprouting broccoli? Your garden—and your tastebuds—will thank you!

Landscaping

1 Views

0 Comments

Write A Comment

*
*
Related Posts All Posts
06.28.2025

Unlock the Secrets of Planting Lavender Seeds or Seedlings in Your Garden

Update The Beauty and Benefits of Lavender in Your Garden Lavender is more than just a beautiful addition to your home garden; it's a multitasking marvel. Known for its intensely fragrant flowers, which bloom from early to late summer, lavender is a favorite among gardeners. Not only does it beautify spaces, it serves as a natural pollinator attractor, bringing bees, butterflies, and other beneficial insects into your yard. Beyond its aesthetic appeal, lavender boasts therapeutic benefits, with its scent often used in aromatherapy to promote relaxation and reduce stress. Understanding When to Plant Lavender: The Perfect Timing For homeowners eager to cultivate lavender in their gardens, timing is key. Planting should typically occur in the spring after the last frost, allowing the young seedlings to acclimate to their environment without the risk of frost damage. However, the optimal planting time can vary by region and depends on the specific type of lavender being planted. If you’re considering growing lavender from seeds, it’s essential to start them indoors approximately 6 to 8 weeks before the last expected frost date in your area. This is especially important for varieties like English lavender (Lavandula angustifolia), which needs that head start to thrive once transferred outdoors. The Different Types of Lavender to Consider Before planting, familiarize yourself with the various types of lavender to select the best fit for your garden. Here are the most popular varieties: English Lavender (Lavandula angustifolia) - Thriving in USDA zones 5 to 8, this classic garden plant is cherished for its hardiness and stunning blooms ranging from lavender to deep purple. Hybrid Lavender (Lavandula x intermedia) - A robust choice that thrives in cooler and warmer climates, this hybrid offers lovely mid to late summer flowers. Spanish Lavender (Lavandula stoechas) - Ideal for warmer climates, it’s known for its unique bract-topped flowers and drought resistance, making it perfect for patio gardening. French Lavender (Lavandula dentata) - It offers a long bloom season but is less fragrant than its English counterpart. For gardeners in colder regions, consider it as a tender annual. Preparing Your Garden for Lavender To ensure your lavender thrives, consider the following tips before planting: Location, Location, Location: Choose a spot that receives full sun for at least 6 to 8 hours a day. Soil Quality: Ensure well-draining soil, as lavender dislikes standing water. Amend your garden soil with sand or gravel if necessary. Spacing: Space your plants appropriately to allow air circulation, which is crucial for preventing diseases. Planting Techniques for Successful Growth Once you've selected the ideal location and prepared your soil, planting lavender can be as simple as following these steps: Dig a hole that is twice the size of the plant’s root ball. Loosen the roots gently to encourage outward growth. Position the plant, ensuring that the base of the stem is level with the soil surface. Water thoroughly after planting and apply a light layer of mulch if necessary, but avoid covering the stems. Future Predictions: The Lavender Growing Trend As more homeowners seek low-maintenance yet stunning plants, lavender’s popularity is only expected to grow. Its various uses—from culinary herbs to natural pest deterrents—make it an attractive plant for modern gardeners. Additionally, lavender farming is becoming more mainstream, not just for home gardeners but also for commercial purposes, with many exploring the potential of lavender oils and products. Conclusion: Embrace Lavender in Your Garden Adding lavender to your gardening repertoire can elevate your garden's aesthetics while providing a habitat for pollinators and a means for relaxation. Given its resilience and versatility, why not start a lavender garden today? Whether you're using seeds or seedlings, understanding the right planting methods and timing is crucial for a thriving garden. Don't overlook the joy that this beautiful herb can bring. Start planning your lavender garden now and enjoy the journey!

06.27.2025

Discover Why Your Bell Peppers Are Small: 8 Key Solutions

Update Understanding Why Your Bell Peppers Are Small Many gardeners, whether seasoned or newbies, often ask, "Why are my bell peppers so small?" This seemingly simple question can lead to a labyrinth of potential solutions. After years of nurturing my pepper plants, I can say with confidence: several critical factors dictate the size of bell peppers. If you’ve been struggling with modest-sized fruits, fear not! With a little care and attention, you can enhance your harvest. Ideal Conditions for Thriving Bell Peppers Getting your bell peppers to flourish begins with understanding their ideal growing conditions. Here’s what you need to ensure: Temperatures: Bell peppers thrive in warm conditions. They do best when planted after the last frost, with nighttime temperatures above 50°F (10°C). Sunlight: Ensure your peppers receive at least 6 to 8 hours of full sunlight each day. Soil Quality: Use well-draining soil, preferably pH balanced between 6 to 6.8. Consider testing your soil to address any deficiencies. Eight Common Reasons for Small Bell Peppers So, what could be holding back your bell peppers from reaching their full potential? Here are eight reasons that might explain the smaller-than-expected fruits, along with solutions to help address them: 1. Timing Is Everything The time of planting plays a crucial role in pepper growth. Early planting allows your plants to mature before the flowering phase, leading to robust growth and larger fruit. Aim to plant as soon as the conditions allow in your zone, as pushing the season can result in smaller yield. 2. Pollination Problems Poor pollination can lead to nutrient deficiencies, resulting in misshapen or tiny bell peppers. Peppers are self-pollinating, so they benefit from a gentle shake or breeze to help distribute pollen within the flowers. For optimal pollination, ensure temperatures remain between 60°F and 70°F (15°C - 21°C). 3. Overcrowding Issues Planting your peppers too close together can lead to competition for resources, resulting in stunted growth. Make sure to adhere to planting guidelines of spacing your plants 12 to 18 inches apart to promote airflow and nutrient access. 4. Water Wisely Inconsistent watering can wreak havoc on your bell pepper plants. Both under and overwatering can lead to stress, ultimately impacting fruit size. Aim for consistent moisture, ensuring the soil is damp but well-draining. 5. Nutrient Deficits Adequate nutrition is vital. If your soil lacks essential nutrients—such as nitrogen, potassium, and phosphorus—your peppers may not grow to full size. Use a balanced fertilizer, and consider organic options like compost or aged manure to enrich your soil. 6. Temperature Extremes Extreme temperatures—both too hot or too cold—can stress plants, leading to stunted growth. Protect your peppers during unexpected cold snaps and provide shade during heat waves to create a stable growing environment. 7. Pests and Diseases Always inspect your plants for signs of pests like aphids or diseases that may be drawing energy away from your fruits. Utilize integrated pest management techniques, including natural repellents and encouraging beneficial insects. 8. Pruning Techniques Sometimes, less is more. Strategic pruning of your bell pepper plants could help direct energy towards fruit production instead of excessive foliage. A balanced approach to pruning can often yield larger and healthier peppers. Taking Action for Bigger Bell Peppers Becoming proactive with your gardening practices can transform your bell pepper yield. Start by addressing each of the above causes, and tailor your practices to meet the needs of your plants. From improving soil conditions to ensuring proper spacing and care, every adjustment can lead to significant improvements in fruit size and quality. Conclusion By understanding the challenges affecting your bell pepper growth, you can set up your garden for success. Embrace these tips and make adjustments as necessary to watch your bell peppers flourish in size and flavor. Ready to dig deeper into your gardening journey? Consider seeking out local gardening clubs or online forums where you can share experiences and solutions with fellow gardening enthusiasts!

04.15.2025

Elevate Your Garden: Discover Seven Easy DIY Pea Trellis Ideas

Update Why Support Your Peas? Understanding Plant Growth Supporting your peas through trellising offers numerous benefits. First and foremost, it promotes healthier growth; peas exposed to sunlight and airflow through strong, vertical support tend to flourish. Trellising helps prevent diseases such as powdery mildew, common among plants that lack good light exposure. Additionally, elevating plants off the ground protects them from pests like slugs, which find it challenging to navigate to leaves and tendrils on a trellis. This support not only enhances health but also boosts productivity, ensuring you get the most out of your garden. A Closer Look at Pea Types and Their Requirements Understanding the different types of peas is essential for effective trellising. Bush peas, like 'Wando', generally reach between 18 inches and 3 feet, whereas vining peas, such as 'Sugar Snap', stretch from 3 to 6 feet tall. Aligning your trellis height with the growth requirements of your specific pea variety ensures consistent support throughout the growing season. Notably, edible peas can be categorized into shell, snap, and snow peas, while sweet peas, known for their fragrant blooms, are inedible. Each type has unique growth characteristics and ideal harvesting times that should also influence your trellising approach. Creative DIY Pea Trellis Solutions You don't need to invest in expensive garden structures to support your pea plants. Here are seven easy DIY ideas that you can create at home: Bamboo Stakes: Simple and affordable, they can be tied together to create a robust triangular or rectangular frame. Wire Fencing: Old wire fencing can be repurposed into a sturdy trellis. Simply set it up and allow the pea plants to climb through the openings. Wooden Lattice: A piece of lattice can add aesthetic value while providing ample climbing space for peas. Garden Arches: A decorative garden arch not only supports your peas but also adds a beautiful feature to your backyard. Netting: Small-mesh netting stretched between supports can serve as a supportive lattice that allows peas to cling as they grow. Fishing Line: For a minimalist approach, using fishing line tied between posts can create a tensioned space for climbing peas. Repurposed Pallets: Old pallets can be mounted on a wall or set up stand-alone to create a vertical garden where peas can flourish. Embracing the Art of Vertical Gardening Vertical gardening presents a unique opportunity for homeowners looking to maximize space while cultivating their passion for gardening. Not only does it streamline the growing process, but it allows plants to thrive in a tightly packed garden without suffocating each other. This approach promotes greater accessibility, making harvesting easier and ensuring you catch those delicious sugar snap peas before they overmature, which can hinder further flowering and pod production. Common Misconceptions About Growing Peas One common misconception is that trellising is unnecessary for bush varieties of peas. However, even bush peas benefit from some level of support to keep them upright, especially as they start producing pods. A little investment in a simple trellis can lead to increased yields and easier access to harvesting. Additionally, many novice gardeners may believe that all types of peas require the same trellis approach, overlooking the specific needs each variety presents. Tips and Best Practices for Trellising Peas When trellising peas, it’s crucial to consider the materials used. Opt for sturdy, weather-resistant materials such as treated wood or galvanized wire to ensure longevity. The trellis should be set up before planting to avoid disturbing the roots later. Aim to anchor the trellis securely into the ground—especially for taller varieties—to withstand the weight of the plants as they grow. Regularly check for any necessary adjustments, ensuring plants have adequate support throughout their growth cycle. Final Thoughts on Trellising Implementing a DIY trellis offers benefits that extend beyond proper plant support. It enhances garden aesthetics, keeps your plants healthier, and creates a more enjoyable gardening experience. Now is the perfect time to consider how trellis structures can elevate your gardening efforts, so roll up your sleeves and get started!

Add Row
Add Element
cropper
update
Home Service Hub
cropper
update

Homeowners seeking trusted advice and resources for maintaining and improving their properties

  • update
  • update
  • update
  • update
  • update
  • update
  • update
Add Element

COMPANY

  • Privacy Policy
  • Terms of Use
  • Advertise
  • Contact Us
  • Menu 5
  • Menu 6
Add Element

949-375-3833

AVAILABLE FROM 8AM - 5PM

Huntington Beach, CA

18685 Main Street 101-228
Huntington Beach, CA 92648

Add Element

ABOUT US

Home Service Hub is a subsidiary of High Octane Digital Group.

Add Element

© 2025 CompanyName All Rights Reserved. Address . Contact Us . Terms of Service . Privacy Policy

Terms of Service

Privacy Policy

Core Modal Title

Sorry, no results found

You Might Find These Articles Interesting

T
Please Check Your Email
We Will Be Following Up Shortly
*
*
*