Add Row
Add Element
HOME SERVICE HUB
Add Element
  • Home
  • Categories
    • Smart Home Solutions
    • Gardening
    • Landscaping
    • Home Exterior
    • Outdoor Living
    • Smart Homes
    • Lawncare
    • Lighting Solutions
    • Plumbing Tips
  • Featured Business Profiles
February 11.2025
3 Minutes Read

Master the Quick and Easy Paper Towel Method to Start Seeds!

Start seeds in a paper towel, seed sprouting demonstration, natural lighting.

Unveiling the Simple Art of Seed Starting

For many aspiring gardeners, the transition from dreaming about lush gardens to actually cultivating plants can be daunting. One of the most crucial steps in this journey is starting seeds, and there's a simple yet highly effective method that can transform your gardening experience: the paper towel method.

Why Start Seeds in a Paper Towel?

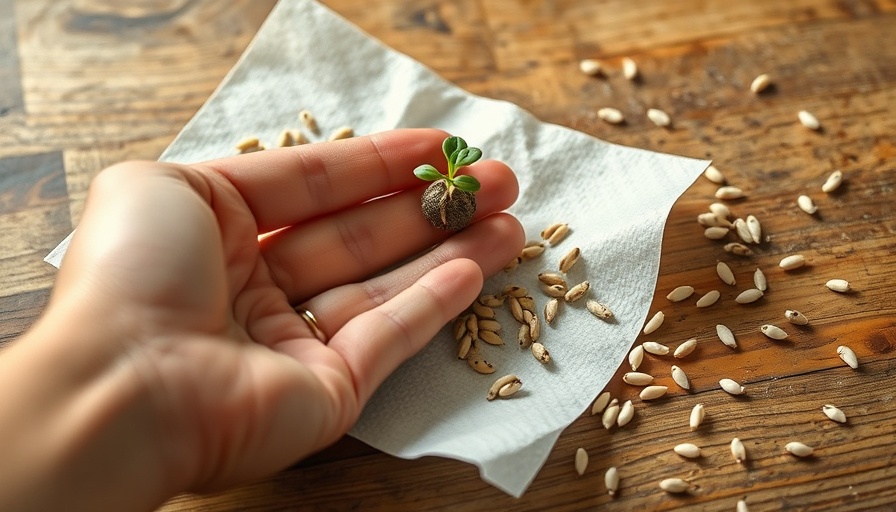
Starting seeds in a paper towel is not just handy; it’s an invaluable skill that helps confirm seed viability. Have you ever opened an old seed packet, unsure if any of them would sprout? The paper towel germination technique comes to the rescue here. By testing your seeds ahead of time, you can save money and space in your indoor gardening setup.

This method is particularly beneficial for those cramped for space or eager to maximize their seed-starting efficiency. Rather than filling trays or pots with soil and planting seeds that may not germinate, you can identify which seeds are worth planting in advance. This way, you’ll only commit space to seeds that are likely to sprout, preventing empty cell packs and wasted resources.

The Basic Supplies You Need

The essentials for the paper towel germination method are quite minimal, making it accessible for anyone:

  • Paper Towels or Coffee Filters: Most gardeners prefer paper towels, but coffee filters work as well.
  • Ziptop Bags or Plastic Containers: These will create a greenhouse effect for humidity and warmth.
  • Water Sprayer: Fine misting is preferable for moistening paper towels.
  • Labels: Keeping track of your seeds’ types and varieties is essential for organization.
  • Seeds: Select your favorites or those you wish to test.

How to Prep and Start Your Seeds

Ready to dive in? Follow these simple steps to get started:

  1. Moisten Your Paper Towel: Dampen the towel or filter either by spritzing water across its surface or running it under a faucet. The goal is to have it moist but not dripping.
  2. Arrange Your Seeds: Place around ten seeds about an inch apart on one side of the towel. This spacing ensures they have enough room to sprout without overcrowding.
  3. Fold and Seal: Carefully fold the paper towel over the seeds, press lightly to ensure good contact, then place it inside a ziptop bag or a plastic container. If using a bag, inflate it slightly to create a mini greenhouse effect which helps maintain humidity.
  4. Label Your Experiment: Include pertinent details like the seed type and date to help track your germination progress.

Benefits of the Paper Towel Method

Learning this technique isn't just about seed starting; it's also about efficiency. By germinating seeds on paper towels, gardeners can:

  • Reduce Wasted Space: Grow only what has proven to be viable.
  • Direct Planting: Once seedlings emerge, you can easily transplant them into pots or soil without overcrowding.
  • Evaluate Older Seeds: This method is particularly valuable for testing older seeds that might have been stored away, allowing gardeners to plan purchases wisely.

Potential Challenges and Solutions

While starting seeds in paper towels is generally straightforward, there are potential pitfalls, such as seeds that fail to sprout. This could stem from various factors:

  • Seed Age: Old seeds may have significantly declined in viability.
  • Moisture Levels: Too much or too little moisture can hinder germination.
  • Temperature Variations: Ensure the seeds remain in a warm area, as temperature plays a crucial role in germination success.

To overcome these challenges, be meticulous with the amount of water used and keep an eye on temperatures in their vicinity. Adjust as necessary.

Join the Gardening Community

The world of gardening opens doors to creativity and community. Sharing experiences with seed starting can foster connections with fellow gardeners. Online forums, local gardening clubs, or even casual conversations with neighbors can lead to enriching exchanges about techniques, successes, and even failures.

Landscaping

9 Views

0 Comments

Write A Comment

*
*
Related Posts All Posts
08.02.2025

Basil Leaves Curling? Discover 8 Key Causes and Solutions

Update Understanding Why Basil Leaves Curl Have you ever looked at your basil plants and noticed their leaves curling inwards or downwards? For many home gardeners, this common issue can be quite alarming, but understanding the causes of curling basil leaves is essential for maintaining a healthy garden. Basil is a beloved herb known for its aromatic flavor and versatility in cooking, so it's important to act swiftly when signs of distress arise. Identifying the Symptoms Password to successful gardening lies in recognizing symptoms early. Typically, the curling of basil leaves can manifest in various ways. Leaves may droop, twist, and even take on a leathery texture. Additionally, if the leaves appear yellowed or discolored, this points towards distress. In worst-case scenarios, the effects could escalate to the plants folding in themselves, resulting in a shriveled and unhealthy appearance. 8 Common Causes of Curling Leaves Curvature of basil leaves is frequently a behavior response to environmental stresses. Here’s a closer look at the possible reasons behind this and solutions for each. 1. Underwatering: The Need for Hydration Underwatering is a primary culprit. If basil plants do not receive enough moisture, leaves start to curl downwards as the plant attempts to conserve moisture. A good watering regime is crucial; ensure the soil feels slightly moist but not waterlogged. 2. Overwatering: The Dangers of Oversaturation On the flip side, overwatering is an equally common issue leading to curled leaves. Too much water encourages root rot, which can result in yellow leaves that droop. To remedy this, check the drainage of your pots and the soil's texture. If you suspect overwatering, repot the plant with fresh, well-draining soil. 3. Pests: The Invisible Threat It's important to be vigilant against pests. Creatures like aphids, spider mites, or whiteflies can wreak havoc on your basil plants. They often cluster on the undersides of leaves, causing curling, discoloration, and a sticky residue. Regular inspections and natural insecticidal solutions can help mitigate these pests. 4. Diseases and Fungal Infections Diseases such as downy mildew and botrytis can cause significant curl damage. Look for grey, white, or sooty splotches on the leaves as tell-tale signs of these fungal issues. Healthy air circulation and appropriate spacing can be preventative measures, while removing affected leaves helps limit disease spread. 5. Temperature Extremes: Stress from the Environment Basil is sensitive to temperature fluctuations. Extreme heat can cause the leaves to curl and wilt, while cold temperatures can stress the plant. If growing basil outdoors, consider protective measures such as shade cloth in high heat or moving pots indoors during unexpected chills. 6. Soil pH Levels: The Foundation of Health The pH levels of your soil directly impact nutrient availability. Basil thrives in slightly acidic soil with a pH of about 6.5 to 7.0. Conduct a soil test to ensure it meets this range, and consider adding amendments if necessary. 7. Nutrient Deficiencies: Vital for Growth Lack of proper nutrients like nitrogen and magnesium can manifest as curling leaves. Fertilizing with a balanced fertilizer and following the supplier's recommendations will support robust plant health. 8. Faulty Pruning: Shape Matters Improper pruning techniques can lead to unwanted stress. Always prune basil correctly, focusing on removing spent leaves while promoting healthy growth patterns. Pruning encourages bushier growth and helps prevent the plant from becoming leggy. Take Action to Revive Your Basil While seeing basil leaves curl can be worrisome, understanding the underlying causes is key to revitalizing your plants. Whether you are combating watering issues, pests, diseases, or environmental stress, taking timely steps will yield healthier basil. As you learn from each experience, your gardening skills will only improve. Conclusion Healthy basil plants can thrive with appropriate care and vigilance. If you notice curling leaves, take a moment to inspect and evaluate. A well-tended garden not only provides fresh herbs to spice up your meals but brings satisfaction and joy to your home. Ready to tackle your basil issues? Start today! Remember, every challenge is an opportunity to enhance your gardening knowledge!

07.30.2025

Essential Tips on How Often to Water New Shrubs for Optimal Growth

Update Understanding the Water Needs for Newly Planted Shrubs Watering newly planted shrubs can be a delicate balancing act, especially during the crucial first year of growth, which lays the foundation for their future health. As you plan the layout of your garden, it’s essential to know how often to water your new shrubs so that they can thrive in your landscape. Factors such as variety, size, climate, and soil type will all play a vital role in determining the watering schedule. The Critical Role of Watering in Establishing Roots Why is watering important for young shrubs? The root system is where the plant absorbs necessary nutrients and moisture. A well-established root system will not only keep your plants healthy but also prepare them to withstand droughts and temperature extremes. When roots extend deep into the soil, they become less vulnerable to dry spells, insect pests, and severe cold. Proper watering helps promote rapid root spread, making it crucial to get this aspect of your shrub care correct. The Influence of Soil Type on Watering Frequency The type of soil surrounding your new shrub can significantly affect its watering requirements. For instance, poor quality, hardpan soil often leads water to run off rather than absorb, while rich, loamy soil retains moisture, making it a better choice for water-hungry plants. When assessing the watering needs, evaluate the soil quality and ensure it maximizes the moisture retention capability, thus allowing deeper root penetration over time. Timing is Everything: Seasonal Planting Considerations The particular season in which you choose to plant will also dictate how often you'll need to water. If you plant in the summer months, be prepared to increase your watering frequency due to heightened heat and potential drought. Conversely, spring plantings may benefit from seasonal rains. Fall planting, particularly for evergreens, requires careful attention to watering during warmer winter days to ensure survival through the colder months. Thus, tailoring your watering schedule according to seasonal variations and climate patterns is key to your shrubs' success. Maximizing Water Efficiency with Targeted Irrigation To improve water conservation, consider creating a basin around the new shrub. This berm will help retain moisture where it's needed, enabling deeper water penetration into the roots. Construct a three-inch-high berm around your plant's base with excavated soil, aligning its edge with the plant's canopy for optimal effect. Alternatively, consider targeted irrigation methods such as drip systems or soaker hoses that deliver a slow and consistent moisture supply directly to the roots, providing the shrub with the best opportunity to establish itself. Best Practices for Deep Watering Now that we know how often to water new shrubs, let’s discuss the best methods for doing it. Harsh overhead sprinklers can deliver uneven moisture; hence, a targeted approach with hose watering or a drip irrigation system is often more effective. Always measure the water flow to assess and maintain the appropriate quantity while watering. Regular monitoring will ensure that you are giving your new plants the best start possible. Conclusion: Your Shrubs Deserve the Best Care Watering new shrubs correctly is not just about survival; it is about ensuring they flourish for years to come. By tailoring your watering frequency to the plant type, soil, season, and utilizing effective watering techniques, you will help your new shrubs thrive. As you work on your garden, remember that the initial investment in proper care pays off with a vibrant and resilient landscape. So grab your watering can and give your shrubs the love they need! If you found these insights helpful, don’t hesitate to further explore more gardening tips that can enhance your outdoor living experience. The right knowledge can transform your garden into a beautiful retreat.

07.24.2025

Maximizing Strawberry Growth: When and How to Fertilize for Best Yields

Update Understanding Your Strawberry Plants: The First Step to Healthy Growth Before you dive into fertilizing your strawberries, it's essential to identify the type of strawberries you are growing. There are primarily three types: June-bearing, day-neutral, and everbearing strawberries. June-bearing types yield fruit in early summer, making them short-lived with a burst of production, while day-neutral varieties provide a steady crop throughout the growing season, weather permitting. Everbearing strawberries offer two harvests: one in late spring and another in late summer. Knowing your variety will help you determine the best fertilization schedule and strategy. Why Fertilizing Strawberries is Crucial for Yield Strawberries are known for producing abundant fruit quickly. Unlike other fruits such as raspberries that take several years to bear fruit, strawberries can reward efforts in just one season. Proper fertilization not only enhances the size and sweetness of the strawberries but also strengthens plants against environmental stressors like drought or pests. Just the right amount of fertilizer can significantly impact your overall yield, supporting a robust and fruitful garden. The Foundation: Healthy Soil is Key Strawberry plants thrive in nutrient-rich soil that is well-draining. Their shallow root systems rely on the upper layers of soil for nutrients, so it's vital to start with a solid foundation. Incorporating organic compost or composted manure into the top few inches of soil before planting can dramatically improve soil quality. This not only boosts nutrient availability but also fosters a healthy microbiome that supports plant growth. Additionally, practicing crop rotation is crucial to prevent disease. Avoid planting strawberries in soil where nightshade family plants, such as tomatoes and peppers, have been grown recently. Choosing the Right Fertilizer: What You Need to Know When it comes to fertilizing strawberries, the choice of fertilizer is just as important as the timing. A balanced fertilizer (like a 10-10-10, containing equal parts nitrogen, phosphorus, and potassium) is often recommended. However, considering an organic berry fertilizer can offer additional benefits. These fertilizers enrich the soil and can enhance overall plant health. Don't forget about micronutrients! Strawberries thrive with the right amount of calcium, magnesium, and boron, so ensure your fertilizer meets these specific needs based on soil tests. Timing Your Fertilization: Optimal Growth Stages Correct timing can significantly affect your strawberry plants' productivity. For June-bearing varieties, early spring fertilization before the bloom stage is vital, as this is when the plants need the most nutrients for fruit development. For everbearing and day-neutral types, a split fertilizer application during early spring and again after the first harvest is ideal. This strategy allows those plants to recuperate and prepare for another round of fruiting later in the season. Common Misconceptions: More is Not Always Better A common misconception among novice gardeners is that more fertilizer equals better yields. Over-fertilizing can lead to poor fruit quality and increased susceptibility to diseases and pests. The root system of strawberries is delicate; too much nitrogen may promote excessive leafy growth at the expense of fruit development. Learning to apply the right amounts through proper soil testing and following guidelines can lead to healthier plants and tastier berries. Conclusion: Your Path to Juicy, Delicious Strawberries Your journey towards growing luscious strawberries starts with understanding the type of plants you have, providing healthy soil, and applying the correct fertilizer at the right time. By taking these steps, you can maximize your garden's yield while enjoying the process. Incorporate these practices to experience the sweet rewards of your gardening efforts!

Terms of Service

Privacy Policy

Core Modal Title

Sorry, no results found

You Might Find These Articles Interesting

T
Please Check Your Email
We Will Be Following Up Shortly
*
*
*