Add Row
Add Element
HOME SERVICE HUB
Add Element
  • Home
  • Categories
    • Smart Home Solutions
    • Gardening
    • Landscaping
    • Home Exterior
    • Outdoor Living
    • Smart Homes
    • Lawncare
    • Lighting Solutions
    • Plumbing Tips
  • Featured Business Profiles
July 07.2025
3 Minutes Read

Why Every Garden Needs a Bee Bath to Attract Pollinators

Bee bath setup highlighting importance for gardens.

Creating a Buzz: The Importance of Bee Baths in Your Garden

Imagine stepping into your garden and witnessing the flurry of life around you—bees, butterflies, and other pollinators dancing from flower to flower. These creatures are vital to the ecosystem, and one simple addition to your garden can significantly enhance their presence: a bee bath. Providing water for these insects is imperative, especially during the hot summer months, making it one of the easiest and most rewarding projects for any homeowner looking to create a haven for wildlife.

Why Are Bee Baths Essential?

As vital contributors to our environment, bees play a crucial role in pollination, which is essential for the growth of many plants and crops. However, like all living beings, they need water to thrive. In urban settings, where natural water sources may be scarce or contaminated with pollutants, a bee bath can provide a safe hydration option. By offering clean and stagnant water, you can help sustain the local bee population, ensuring that they continue to pollinate your plants and contribute to biodiversity.

DIY: Crafting Your Own Bee Bath

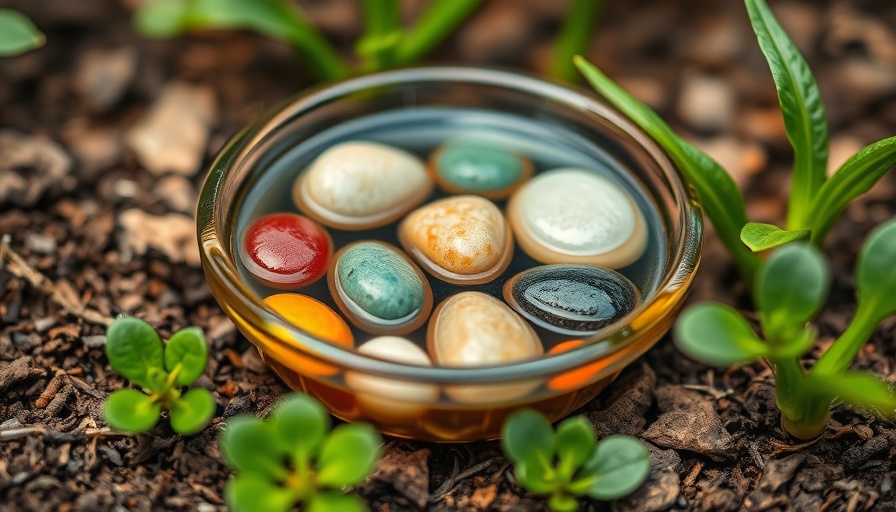
Creating a bee bath is a straightforward DIY project that requires minimal supplies. Here's a quick guide:

  • Materials: All you need is a shallow dish, stones, and fresh water.
  • Instructions: Choose a shallow bowl or plate, place a few stones inside, and fill with water. Make sure some stones stick out above the water line, offering a perch for the bees.
  • Placement: Position your bee bath in a sunny, safe area close to flowering plants where pollinators already gather.

During dry spells, make it a habit to change the water frequently to prevent evaporation.

Bee Baths: Not Just for Bees

While the primary focus is on bees, don’t overlook the other pollinators that can benefit from your bee bath. Butterflies, for instance, enjoy shallow water and may appreciate a small mud puddle nearby for minerals. Additionally, if you have a birdbath, adding stones or pebbles can provide a safe drinking spot for bees while also serving the needs of your feathered friends.

Caring for Your Bee Bath

Maintenance is key to ensuring your bee bath serves its purpose. Replace the water regularly, especially in hot weather, to prevent stagnation which can attract mosquitoes. In winter, consider removing the bath to prevent ice formation and to keep your garden looking tidy.

Expanding Your Buzz-Worthy Garden

A bee bath can also be part of a larger effort to attract pollinators. By incorporating a variety of native plants and providing shelter, you create a comprehensive ecosystem that supports not only bees but other beneficial insects and wildlife. Think about adding wildflower patches, leaving some areas of your garden untamed, or installing insect hotels.

The Ripple Effect: Impact on Your Garden and Community

By connecting with nature through gardening and providing resources such as bee baths, you foster a more sustainable garden. This project not only enhances your property value but also contributes positively to your community’s environment. Neighbors may follow suit, creating a network of vibrant gardens that promote biodiversity.

Actionable Insights

If you are passionate about gardening and the environment, now is the perfect time to create your own bee bath! Not only will this small endeavor make your garden more appealing and lively, but it will also support our precious pollinators. Take a step forward and witness the benefits unfold all around you.

In conclusion, a simple bee bath can create a significant impact on your garden and the surrounding ecosystem. By providing a water source, you pave the way for flourishing plant life and a thriving community of pollinators. Let’s work together to nurture our environment one garden at a time!

Landscaping

6 Views

0 Comments

Write A Comment

*
*
Related Posts All Posts
08.23.2025

The Essential Guide to Harvesting Dill for Garden Success

Update Understanding the Ideal Timing for Dill Harvesting Harvesting dill might seem straightforward, but to truly enjoy its robust flavor and aroma in your dishes, timing is everything. This herb can add a delightful twist to culinary creations and enhance your garden’s aesthetic. The key is knowing when to pick the leaves and seeds for optimal taste and yield. The Importance of Growth Stages in Dill Dill is a versatile herb that grows in stages, each offering its unique flavor profile. The leaves, or fronds, can be harvested early in the growing process, typically about two months after seeding. This is when the leaves are tender and packed with flavor. As the plant matures, dill begins to flower and produce seeds. The seeds can be harvested once they turn brown, a mark of ripeness that indicates they are ready for use in cooking or as a potent ingredient for pickling. Visual Cues: How to Know When to Harvest Recognizing when to harvest your dill plant involves careful observation. When the fronds reach about 8-10 inches in height and are lush and green, it’s the perfect time to snip a few leaves. Wait until the flowers begin to bloom if you're looking to harvest seeds. This is a pivotal moment in the dill plant's lifecycle, indicating that the seeds have developed fully and are ready for picking. Harvesting Techniques for Maximum Flavor When it comes to harvesting dill, gentle techniques yield the best results. Use sharp scissors or garden shears to cut the fronds at the base, allowing the plant to continue growing. If you’re harvesting seeds, twist the flower head gently and collect the brown seeds. However, always ensure that you leave enough foliage so the plant can thrive after trimming. This approach not only ensures a continuous supply of dill but also helps maintain the plant's health. Storing and Preserving Dill for Future Use Once harvested, dill can be stored in various ways to maintain its freshness. Refrigerating it will help keep the leaves crisp for a week or so. For longer preservation, consider drying your dill. Lay the fronds flat on a clean surface like paper towels in a dark, dry area. Once dried, crumble the leaves into an airtight container. This method allows you to enjoy the flavors of your freshly harvested dill throughout the year. Potential Challenges: Dealing with Pests and Diseases A thriving dill plant may sometimes attract pests like aphids or spider mites, which can affect growth and flavor. Keeping a vigilant eye on your dill will help you catch any issues quickly. A simple insecticidal soap can usually remedy pest issues. Additionally, ensuring proper spacing and air circulation can prevent diseases and keep your herb healthy and productive. Final Thoughts: The Joy of Growing and Using Your Own Dill Dill, with its unique flavor and aroma, enhances everything from salads to main dishes. It enriches your gardening experience by encouraging following best practices and caring for your herbs. Armed with the knowledge of when and how to harvest dill, you can maximize your culinary endeavors and transform your garden into a flourishing herb haven. So grab those scissors and enjoy the fruits (or herbs) of your labor! To further enhance your gardening skills and explore more valuable tips on growing herbs, stay engaged with community forums and local gardening classes. They offer insights that can turn your gardening endeavors into masterpieces.

08.19.2025

When to Cut Back Catmint: 3 Easy Options for Homeowners

Update Understanding Catmint: A Gardener's DelightCatmint, or Nepeta, is a beloved addition to many gardens due to its captivating blossoms and ease of care. With its aromatic foliage and ability to attract pollinators, catmint enhances any garden's appeal, making it a favorite among homeowners.Why Timing Matters When Cutting Back CatmintTiming is crucial when it comes to cutting back catmint. Cutting too early or too late can indeed impact the plant's health and blooming patterns. Ideally, pruning should occur in early spring, just as the new growth begins to emerge. This timing encourages a bushier appearance and maximizes blooms later in the season.Three Effective Methods for Cutting Back Catmint1. **Simple Trimming:** Grab a pair of sharp shears and trim back the plants to about six inches above the ground. This method is straightforward and creates a clean, tidy look. It also facilitates new growth, ensuring your catmint is robust throughout the growing season.2. **Deadheading:** Remove spent flowers to encourage new blooms. Regular deadheading throughout the blooming period not only keeps the plant looking good but also encourages more vibrant displays as it prevents the plant from putting energy into seed production.3. **Hard Pruning:** If your catmint becomes overzealous, hard pruning may be necessary. In late summer, follow up with a more drastic cut back to about a foot tall. This technique allows for a mid-season resurgence that rejuvenates the plant.Common Misconceptions About Catmint CareOne common misconception is that cutting back catmint drastically will yield fewer blooms. In reality, proper pruning stimulates growth, leading to healthier plants with more abundant flowers.Future Insights and Trends in GardeningAs gardening trends shift toward sustainability and low maintenance, the popularity of resilient plants like catmint will likely rise. Homeowners searching for beautiful yet easy-to-care-for plants often find catmint as a preferred choice. Understanding how to care for and prune this plant effectively is invaluable as gardens evolve to meet new standards.Actionable Tips for HomeownersFor those looking to enhance their garden appeal with catmint, here are some actionable insights: First, invest in quality gardening tools to ensure effective pruning and maintenance. Second, create a schedule to monitor growth, ensuring timely interventions when needed.The Overall Benefits of Maintaining Your CatmintBy mastering the art of catmint pruning, homeowners can enjoy lush blooms that contribute to a vibrant garden ecosystem. The plant's rapid growth and resilience make it a rewarding choice for any landscape. Its ability to thrive with minimal effort matches the current gardening trend of efficiency and beauty.In conclusion, regular maintenance and understanding the best practices for catmint will ensure it flourishes season after season, enriching your home garden with its beauty and fragrance. If you're passionate about gardening, consider digging deeper into catmint care and enhance your outdoor living space!

08.16.2025

Are You Wondering Why Your Cucumbers Are Curling? Here’s What to Know!

Update Understanding the Mystery of Curling Cucumbers If you've ever bitten into a fresh cucumber from your garden only to find it bitter and oddly shaped, you're not alone. Many homeowners face the challenge of curling cucumbers, a common issue that can hinder the enjoyment of homegrown produce. But what causes this curling? Is there a solution to ensure your cucumbers grow straight and healthy? This article will explore the various factors contributing to cucumber curling, providing you with valuable insights and practical solutions. Common Causes of Cucumber Curling Cucumber curling can stem from several factors. One primary cause is inadequate watering. Cucumbers thrive on moisture, and inconsistent watering can lead to stress, causing the plants to develop curled or distorted fruit. Another contributing factor is environmental stress due to extreme temperatures, either too hot or too cold. Cucumbers prefer a warm climate; exposure to cold nights can adversely affect their growth. Consider Soil Quality Soil plays a significant role in cucumber development. Poor-quality soil lacking essential nutrients can lead to curling as the plant struggles to absorb what it needs to grow properly. Ensuring your garden soil is rich in organic matter and properly balanced with nutrients is vital for healthy cucumber plants. Regularly testing your soil and improving it with compost or fertilizers can make all the difference. Insect Infestations and Diseases Pests like aphids, spider mites, and cucumber beetles can also be responsible for cucumber curling. These insects suck sap from the leaves and stems, weakening the plant and affecting its overall health. Regularly inspecting your plants and employing integrated pest management strategies can help combat these issues. Additionally, diseases such as powdery mildew can weaken the plant, contributing to fruit growth problems like curling. Strategies for Prevention Prevention is often the best cure for gardening woes. To prevent cucumber curling, implement the following best practices: **Regular watering**: Maintain consistent soil moisture, especially during dry spells. **Monitor temperatures**: Use row covers during cold nights and mulch to regulate soil temperature. **Enhance soil nutrition**: Use compost and organic fertilizers to keep your soil healthy. **Pest management**: Regularly check for pests and apply organic treatments when necessary. Future Predictions: Will Curling Cucumbers Become a Thing of the Past? With the rise of smart gardening practices and advanced horticultural science, homeowners may find increased success in growing straight, healthy cucumbers. Innovations like soil sensors and automated watering systems could provide optimal growing conditions, reducing the prevalence of common issues such as curling. As more homeowners adopt these technologies, we might see a shift in how we grow cucumbers and other vegetables, leading to healthier harvests. Actionable Insights for Gardeners Taking action means adapting your gardening methods. Start by assessing your watering routine and soil quality. Consider employing simple pest control methods and planting varieties that are disease-resistant. These adjustments not only improve cucumber growth but also enrich your gardening experience. Conclusion By understanding the reasons behind cucumber curling and implementing the recommended strategies, you can cultivate a thriving garden, leading to an abundant harvest. Remember, a little prevention goes a long way in gardening. Enjoy the fruits of your labor, and share your success stories with fellow gardening enthusiasts. Happy gardening!

Terms of Service

Privacy Policy

Core Modal Title

Sorry, no results found

You Might Find These Articles Interesting

T
Please Check Your Email
We Will Be Following Up Shortly
*
*
*