Add Row
Add Element
HOME SERVICE HUB
Add Element
  • Home
  • Categories
    • Smart Home Solutions
    • Gardening
    • Landscaping
    • Home Exterior
    • Outdoor Living
    • Smart Homes
    • Lawncare
    • Lighting Solutions
    • Plumbing Tips
  • Featured Business Profiles
January 07.2025
2 Minutes Read

Two Simple Techniques to Grow Beets from Seed for a Vibrant Garden

Educational collage on growing beets, seed to harvest.

The Best Time to Plant and Enjoy Beets

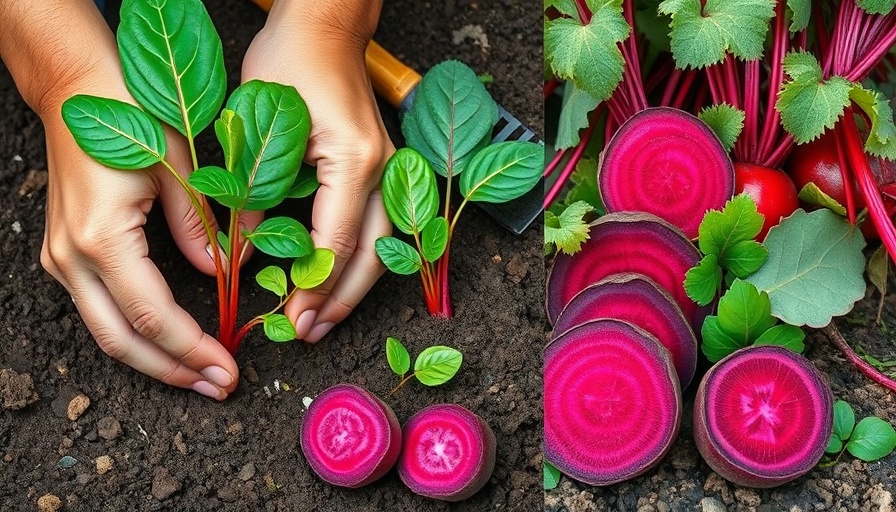
Growing beets from seeds is a rewarding task any garden enthusiast should try, especially if you're looking for dual-purpose veggies that offer both edible roots and leaves. Beets not only provide juicy roots but also healthy greens that are perfect for salads and stir-fry dishes. Planting beet seeds will set your garden on track to deliver fresh produce in just a couple of months.

Direct Sowing vs. Indoor Sowing: Which is Better?

When it comes to planting methods, home gardeners have two main options: direct sowing in the garden or starting seeds indoors. Direct sowing beet seeds is the more traditional and easier method, typically done when the soil reaches around 50°F (10°C). This technique results in beets that are uniform and eliminates the need for transplanting. Just plant seeds about 1/2 inch deep, one inch apart, and keep rows 12 to 16 inches apart for best results. However, starting seeds indoors under grow lights or using a bright window lets you enjoy quicker growth, with produce ready a few weeks before those directly sown.

Unique Benefits of Growing Beets

Apart from their earthy sweetness, beets are nutritionally rich. With an abundance of vitamins such as manganese and folate, as well as dietary fiber, they offer health benefits that are hard to ignore. For those seeking continuous yield, it's wise to engage in succession planting. Sowing seeds every 2-3 weeks from mid-spring through late summer will keep your root and greenery supply steady right till the fall's cooler months.

Helpful Story Examples

Consider Linda's summer garden, where she planted a mix of colored beets. By spacing her beets appropriately and tending to them with measured watering, she harvested a variety of radiant root vegetables and enjoyed the delicate tops in her meals. Whether she roasted, pickled, or simply steamed them, the versatility and rewards of growing her beets made the endeavor worthwhile.

Relevance to Current Events

With increasing interest in gardening as a hobby that promises self-sufficiency and wellbeing, growing beets offers an apt solution. As more people become conscious of their food sources, beets stand out for their quick growth cycle and minimal care needs, fitting well into the busy lifestyles of home-focused individuals.

Landscaping

7 Views

0 Comments

Write A Comment

*
*
Related Posts All Posts
12.11.2025

Transform Your Garden with Ninebark: The Ultimate Shrub for Beauty and Wildlife

Update Why Choose Ninebark for Your Garden? If you're on the lookout for a fast-growing shrub that promises beauty and wildlife appeal, then the Common Ninebark, or Physocarpus opulifolius, should top your list. This native plant not only offers visually captivating foliage but also supports local ecosystems by attracting pollinators like bees and providing food for birds. With varieties such as the dazzling Tiny Wine with its rich maroon leaves, and the more robust Common Ninebark, you can select the perfect fit for your landscaping needs. The plant's unique exfoliating bark, which peels away in layers as it matures, adds an incredible texture throughout winter, making Ninebark a four-season showstopper that’s invigorating to behold. Ninebark: The Garden All-Rounder One of Ninebark's standout features is its impressive adaptability. This shrub thrives in a variety of soils—from sandy to loamy to clay—making it suitable for a multitude of garden conditions. Whether your yard experiences full sun or partial shade, Ninebark can flourish with minimal fuss. For homeowners worried about space, many cultivars exist in varying sizes. For instance, the dwarf ‘Tiny Wine’ is perfect for smaller gardens, growing to a manageable 36-60 inches, while the standard variety can reach up to 10 feet tall. Whichever you choose, ensure you plant it with enough room to spread its beautiful branches! Year-Round Interest Awaits Planting Ninebark guarantees an exciting visual treat throughout the year. In early spring, you can expect clusters of white or pink flowers that bloom and attract a flurry of pollinators, followed by lush green leaves in summer. By fall, these blossoms transform into seed clusters, providing sustenance for songbirds during winter months. And as the frost sets in, Ninebark showcases its signature bark, which glows against the snow, keeping your garden beautifully animated even in the harshest weather. Easy Care for Tree-Lovers Caring for Ninebark couldn’t be simpler. Once established, these plants are drought-tolerant—an added bonus for those in drier regions. And for those interested in container gardening, younger Ninebarks can thrive in pots, making them a charming addition to patios or spacious porches. As a bonus, these shrubs are resistant to deer and rabbits, meaning your beautiful plants are less likely to become a feast for local wildlife. Pruning and Growth Tips Pruning Ninebark after it flowers, typically in mid-August, ensures the shrub retains a healthy structure and airflow around its branches. Keep in mind that these shrubs bloom on old wood, so limit your pruning to maintain the shape and ensure your Ninebark remains the garden's flourishing centerpiece. For those eager to propagate Ninebark, hardwood cuttings taken in late fall or early winter can yield new plants that root by the next growing season, spreading the beauty of this magnificent shrub. Conclusion: A Shrub Worth Growing In conclusion, planting a Ninebark is a decision that will bring multiple benefits to your garden, not just in aesthetics but also in providing essential support to local wildlife. If you're looking to enhance your yard with a resilient, beautiful shrub that offers colorful interest and wildlife support throughout all seasons, consider adding Ninebark to your landscape. Happy planting!

12.08.2025

Discover the Secrets to Successfully Growing Jalapeños from Seed

Update The Joy of Growing Jalapeños from Seed For many gardening enthusiasts, there's a deep satisfaction in cultivating jalapeños from seed rather than purchasing seedlings from a nursery. Starting from seed not only offers a sense of accomplishment but gives you more control over the variety, yield, and overall health of your plants. Jalapeños, prized for their vibrant flavor and versatility in the kitchen, can flourish in various conditions, making them an ideal choice for any home gardener. Why Choose Jalapeños? As part of the nightshade family, jalapeños belong alongside tomatoes and eggplants. They sway between the mild and the fiery, sitting comfortably in the range of 2,500 to 8,000 Scoville heat units. While many gardeners harvest their jalapeños while still green, waiting for them to ripen to a fiery red offers a completely different flavor profile and increased heat. Not only do jalapeños add a delicious kick to sauces, salsas, and dishes, but they are also well-suited for drying, pickling, or freezing for future enjoyment. The Benefits of Starting from Seed While it may seem simpler to purchase seedlings, growing jalapeños from seeds opens up a world of variety. Seed catalogs boast an impressive selection, allowing you to choose from unique types like the compact Pot-a-Peno or the robust Jalafuego. With seeds, you can also time your growth perfectly to match the outdoor planting conditions, setting your jalapeños up for a thriving season. Additionally, growing from seed can be cost-effective for larger home gardens, as it allows for extensive planting without the financial burden of purchasing multiple seedlings. Four Effective Methods to Start Jalapeños from Seed There are several creative and effective ways to start your seeds indoors, ensuring that your jalapeños are primed for an outdoor garden. Here are a few methods to consider: Cell Packs and Seedling Trays: This traditional method allows for many seeds to be started at once. The standardized trays fit conveniently under grow lights, providing ideal conditions for germination. Pots: For smaller batches, 4-inch pots work perfectly, allowing you to monitor each seedling's growth while also being durable and reusable. Sowing two seeds per pot is an efficient way to ensure you have strong plants. Soil Blocks: Using soil blockers offers an innovative approach to seed starting. This technique not only minimizes waste but provides excellent aeration and drainage for the seedlings. Paper Towel Germination: Ideal for older seeds, this method involves sprouting seeds in damp paper towels. Once seeds have germinated, they can be transferred to soil, ensuring fresh growth. Practical Tips for Successful Jalapeño Cultivation To ensure that your jalapeños thrive, here are some additional tips to boost your success: Maintain a consistent temperature during germination. Jalapeños prefer warmth, so keeping them in a warm area or using seedling heat mats can enhance sprouting rates. Utilize good-quality soil that provides adequate drainage to prevent rot. A nutrient-rich potting mix will help seedlings develop strong root systems. After transplanting outdoors, ensure your jalapeños have plenty of sunlight, ideally around six to eight hours daily, to sustain healthy growth. Regular watering is crucial, especially during fruit development. Ensure the soil remains consistently moist but not waterlogged. Sharing the Bounty One of the most rewarding aspects of growing jalapeños is the abundance they provide. As you harvest your crop, consider sharing your bounty with friends or neighbors, or experiment with recipes that highlight their unique flavor. From homemade salsa to spicy additions in your favorite dishes, jalapeños lend excitement to any meal. Your Gardening Adventure Awaits In embarking on your journey to grow jalapeños from seed, you embrace a rewarding experience that will enhance your gardening skills and culinary delights. Whether you're a seasoned gardener or just starting, the joy of nurturing plants from their early stages to fruitful maturity is unparalleled. Dive into the world of jalapeño cultivation and enjoy a flavorful harvest right from your backyard! So, roll up your sleeves, grab your seeds, and start your jalapeño growing adventure today!

12.06.2025

Unlock the Secrets of Rabbit Foot Fern Care for a Stunning Indoor Garden

Update Discover the Charm of Rabbit Foot Ferns Rabbit foot ferns, scientifically known as Davallia fejeensis, stand out in the houseplant world, not only for their lacy green fronds but also for their distinctive fuzzy rhizomes. These furry roots, which resemble the feet of rabbits, give this perennial fern its unique appeal. Originally from the lush landscapes of Fiji, these whimsical plants can add both character and texture to your indoor spaces. Caring for Your Rabbit Foot Fern: The Essentials One of the best features of rabbit foot ferns is their straightforward care routine. They thrive in humid environments where indirect light predominates. Too much direct sunlight can scorch their delicate fronds, so it's best to place them near east-facing windows or under sheer curtains to filter the light. Humidity is vital; consider misting their rhizomes regularly to keep them healthy and happy. Creating the Perfect Environment: Light and Soil Rabbit foot ferns flourish in slightly acidic, well-draining soil. Even though they can tolerate less-than-ideal conditions, the right mix will encourage vibrant growth. A peat-based potting mix allows for excellent drainage and mimics their natural habitat, where they clamber across tree surfaces. When it comes to light, ensure your fern gets a balanced exposure—about 1-2 hours of direct sunlight, ideally during the morning. Watering Tips for Healthier Plants Consistency is key for watering rabbit foot ferns; keep the soil moist but avoid making it waterlogged. These ferns prefer a damp atmosphere as they absorb moisture from the air through their rhizomes. During winter, reduce watering frequency since the plants go semi-dormant, but do not let them dry out completely. Recognizing Common Issues and Their Solutions Despite their resilience, rabbit foot ferns can face challenges. Common issues include scorched fronds from excessive direct sun exposure, or limp, yellowing leaves from overwatering. Observe your fern closely—if the rhizomes start browning or wilting, adjust your watering habits or light exposure accordingly. Pest issues such as aphids and mealybugs may also arise, so keep an eye out and treat these concerns promptly with non-toxic solutions. Propagating Your Rabbit Foot Fern Propagation can be an enjoyable project for plant enthusiasts. You can divide the rhizomes of an older fern or take cuttings. The most effective way to propagate is to snip a 2-3 inch section of rhizome with an attached frond, place it in a small container with potting mix, and give it the same care as an adult plant. With patience and proper care, a new rabbit foot fern can flourish! The Aesthetic Appeal of Rabbit Foot Ferns What sets the rabbit foot fern apart is not only its attractive foliage but also how it can be displayed. Their creeping rhizomes can cascade beautifully over the edges of pots, creating a unique visual effect. For avid gardeners or homeowners wanting to enhance their spaces, these ferns offer a combination of elegance and fun. Rabbit foot ferns provide both the beauty of lush foliage and the quirky appeal of visible root systems. Their easygoing nature means you can enjoy their charm without overwhelming yourself with complicated care routines. Ready to add this enchanting houseplant to your indoor garden? Create a cozy little corner for your rabbit foot fern and watch it grow and thrive!

Terms of Service

Privacy Policy

Core Modal Title

Sorry, no results found

You Might Find These Articles Interesting

T
Please Check Your Email
We Will Be Following Up Shortly
*
*
*