Add Row
Add Element
HOME SERVICE HUB
Add Element
  • Home
  • Categories
    • Smart Home Solutions
    • Gardening
    • Landscaping
    • Home Exterior
    • Outdoor Living
    • Smart Homes
    • Lawncare
    • Lighting Solutions
    • Plumbing Tips
  • Featured Business Profiles
February 14.2025
3 Minutes Read

Maximize Productivity with an Efficient Garage Workshop Setup

Efficient garage workshop with organized tools and workbench setup.

Boosting Efficiency in Your Garage Workshop

Transforming your garage into a functional workshop requires more than just a desire to build; it calls for strategic planning and effective organization. This guide offers a mixture of innovative techniques and essential tips for creating a garage workshop that is not only efficient but also safe and inspirational.

Understanding Your Workshop Space

The first step in revamping your garage workshop is to assess your available space thoroughly. Take careful measurements of your garage, noting dimensions, ceiling height, and any obstructions that could affect your layout. This assessment lays the groundwork for an effective design.

Consider what you'll be working on frequently—be it woodworking, automotive maintenance, or general DIY projects. Each task may require different tools and space, highlighting the importance of establishing distinct task zones within your workshop that cater to varied activities.

The Importance of Workflow Design

Creating a functional workflow is essential for any garage workshop. Begin by segmenting your space into specific zones, ensuring tools related to each task are easy to access. For example, keep woodworking tools near the woodworking zone, and maintain storage for automotive supplies next to your mechanics area.

Optimizing your workstation layout can significantly improve productivity. Positioning your workbench centrally allows you to reach for tools without excessive movement, minimizing downtime during projects. Additionally, ensure that pathways remain clear to facilitate safe and efficient movement around the workshop.

Illuminating Your Workspace

A well-lit workshop enhances visibility and reduces strain during intricate tasks. Utilize natural light through windows during the day, but don't rely solely on it. Install overhead LED lights to create a bright and inviting atmosphere, complemented by task lighting directly above work areas for detailed projects. This layered lighting approach not only improves usability but makes the workshop a more pleasant place to work.

Investing in Essential Tools

Equipping your garage workshop with the right tools is vital for tackling projects efficiently. An array of essential hand tools like hammers, screwdrivers, and measuring tools provides a solid foundation. Pair these with key power tools including a cordless drill and circular saw to enhance versatility. Remember, the right tool for the right job can save both time and frustration.

Garages and Climate Control

Do not overlook the significance of your garage door in workshop efficiency. Insulating your garage door helps regulate temperature, saves energy, and minimizes noise, creating a more attractive and usable environment. Selecting a quality garage door opener can improve accessibility and convenience, allowing for smoother transitions between projects.

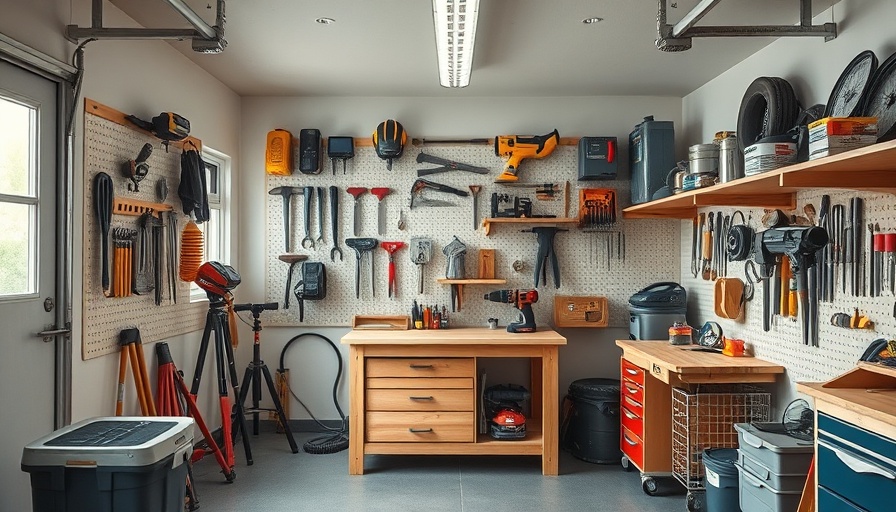
Organizing Your Space

To maximize efficiency, organization is key. Implement shelving systems, pegboards, and locked cabinets to store tools and materials neatly. Clearly labeling these storage solutions ensures that everything has a designated place, reducing time spent searching for tools and fostering a clean workspace.

Practical Steps for Improvement

As you proceed with your garage workshop project, remain adaptable. Check in on your original plans and budget, making adjustments to ensure your workshop remains functional as needs evolve. Regular organization sessions can help maintain efficiency, keeping clutter at bay and ensuring the workspace serves its purpose effectively.

In conclusion, whether you are a DIY enthusiast or a budding mechanic, setting up a garage workshop that meets your creative needs involves careful planning. By optimizing space, designing for workflow, investing in the right tools, and ensuring proper organization, you can create an inspiring environment that makes every project more enjoyable.

Home Exterior

7 Views

0 Comments

Write A Comment

*
*
Related Posts All Posts
10.18.2025

Enhance Your Home's Energy Efficiency: How to Insulate Rim Joists with Spray Foam

Update Understanding the Importance of Rim Joist Insulation For homeowners looking to enhance energy efficiency, one often-overlooked area is the rim joist—an essential part of your home’s structural framework that runs along the perimeter of your foundation. Rim joists not only support the weight of the floors above but can also be a significant source of heat loss. Insulating rim joists effectively can reduce energy costs and improve comfort levels across your living spaces. Why Choose Spray Foam for Rim Joist Insulation? Spray foam insulation presents several advantages for rim joist insulation. Firstly, it boasts a high R-value, which signifies its effectiveness in resisting heat transfer. According to industry insights, spray foam delivers exceptional thermal insulation, often outperforming traditional insulation options like fiberglass batts. Moreover, the air-sealing properties of spray foam are superior. It expands upon application, filling gaps, cracks, and voids that may otherwise allow cold air to seep into your home. This not only enhances energy efficiency but also prevents moisture penetration that can lead to mold growth—a major concern for many households, especially in humid climates. How to Insulate Rim Joists with Spray Foam: A Step-by-Step Guide Although insulating rim joists with spray foam can be a DIY task, it’s crucial to approach it with careful planning and the right tools. Here’s a simplified process based on expert recommendations: Prepare the Area: Inspect the rim joists for existing damage, gaps, or overgrowth. Clear the area of dust and debris to ensure a solid bonding surface for the foam. Gather Your Equipment: Use personal protective equipment (PPE) such as gloves, goggles, and a respirator to safeguard against the chemicals in spray foam. Ensuring adequate ventilation in the work area is vital. Seal Gaps: Begin by applying a quality sealant to any pre-existing cracks or holes using caulk. Let this cure before spraying the foam. Shake and Spray: Shake the spray foam can before attaching the nozzle and applying it evenly along the joist. Start at one end and cover every gap, ensuring that the foam expands to fill any voids. Trim Excess Foam: Once the foam has cured, use a utility knife to trim away any excess material. This will help maintain a neat appearance and ensure even insulation levels. Key Considerations and Safety Precautions Working with spray foam requires utmost care. It’s imperative to follow the manufacturer’s instructions regarding safe handling and application thresholds. Ensure you’re working in an environment with good airflow to avoid inhaling chemical vapors. Notably, spray foam can adhere to surfaces permanently; therefore, familiarize yourself with the equipment and practice on a scrap piece, if possible. The Lasting Benefits of Properly Insulated Rim Joists By insulating your rim joists effectively, you’re likely to notice a significant difference in your home’s utility bills along with improved comfort. Expert analysis indicates that a substantial number of homeowners can cut back on energy usage by insulating neglected areas like rim joists. Moreover, investing in quality spray foam insulation ensures longevity and resilience, as foam won’t settle, sag, or degrade over time, maintaining its insulating properties for many years. FAQs: Everything You Need to Know About Rim Joist Insulation What is the R-value for rim joist insulation? The recommended R-value can vary by climate zone; typically, a value between R13 and R20 is advisable to optimize thermal resistance. Is insulating rim joists really worth it? Absolutely! Proper insulation minimizes air leakage, keeping your living area warm in winter and cool in summer, considerably extending the life of your HVAC system. What kind of foam should I use? Closed-cell spray foam is generally recommended for its robust insulation properties and ability to serve as a vapor barrier, making it suitable for humid conditions. Conclusion: Take Action Today! Understanding the critical role of rim joist insulation and the advantages of using spray foam can empower you as a homeowner. By insulating rim joists, not only do you improve the energy efficiency of your home, but you also contribute to a more sustainable living environment. If you’re considering this upgrade, gather the necessary information, prep your materials, and equip yourself with the right insights. Don’t hesitate; protect your home and enjoy the benefits that come with improved thermal efficiency!

10.17.2025

Why Homeowners Are Turning to Architectural Salvage for Upgrades

Update Exploring Architectural Salvage: A Guide for Homeowners As homeowners increasingly seek unique and sustainable options for renovations, the world of architectural salvage offers a treasure trove of possibilities. From reclaimed wood to vintage fixtures, these materials carry stories and character, making them perfect for creating distinctive living spaces. This article explores the ins and outs of salvaging materials for home upgrades, inspired by a recent podcast segment. Why Salvage? The Value of Architectural Reuse Recent discussions within the Fine Homebuilding podcast spotlight the growing trend of incorporating salvaged materials into home renovations. Often, homeowners are hesitant about salvaging due to misconceptions about quality or usability. However, repurposing architectural elements not only helps reduce waste but also preserves history. For example, salvaged doors and windows can add charm while meeting modern energy efficiency standards with the right updates. A Listener's Journey: Sarah's Salvaged Success In the podcast, a listener named Sarah shared her experience transforming her historic home by using pieces from local architectural salvage yards. Sarah discovered how antique light fixtures and vintage hardwood flooring enriched her home’s ambiance and allowed her to tell its story. Her project exemplifies how salvaged materials can serve as unique focal points while emphasizing a commitment to sustainability. The Challenges and Rewards of Salvaging Materials While salvaging offers numerous benefits, it's not without its challenges. Homeowners like Sarah have navigated logistical hurdles, including transportation and fitting salvaged items into modern designs. However, these challenges can be mitigated by collaborating with expert contractors familiar with salvaged goods. Moreover, savvy homeowners often find that the time invested pays off, both in emotional satisfaction and added home value. Creative Solutions: Transforming Old into New Using salvaged materials doesn't have to mean forgoing modern aesthetics. Innovative homeowners blend the old with the new to create spaces that feel fresh yet timeless. For example, custom furniture made from reclaimed wood, or feature walls incorporating vintage tiles, allow individuals to express their creativity. As shared by the podcast hosts, these projects encourage local artisans and foster a sense of community. Future Trends: Sustainability Meets Style As awareness of environmental issues rises, sustainability in home renovation is becoming paramount. Architectural salvage aligns perfectly with this ethos, allowing homeowners to make responsible choices without sacrificing style. Experts predict this trend will not only grow, but evolve, leading to new methods of recycling and repurposing materials in innovative ways. Final Thoughts: What Salvaging Means for Your Home Engaging with salvaged materials can transform your home into a unique expression of character and history while supporting sustainable practices. Whether you are upgrading an entire space or looking to add a distinctive feature, architectural salvage stands as a viable, rewarding option. So why not dive into this exciting realm and see what treasures await? If you’re considering a renovation, explore local salvage yards and collections to make informed decisions. You might uncover the perfect piece that not only enhances your home’s aesthetic but also reflects your personal commitment to sustainable living.

10.11.2025

How Innovative Dust Containment Enhances Home Exterior Upgrades

Update Revolutionizing Dust Control: The New Approach As homeowners embark on various upgrades, especially in exterior projects, managing dust effectively is crucial. While traditional means of dust control often fall short, innovative dust containment systems are stepping in to change the narrative. Understanding these systems not only elevates your renovation experience, but also ensures cleaner and safer spaces during and after construction. Why Dust Control Matters Creating an environment that minimizes dust is essential, especially when undertaking renovations. Protecting your outdoor and indoor spaces from dust accumulation is vital for maintaining cleanliness, health, and functionality. Dust can aggravate allergies and pose hazards to respiratory health, making effective dust containment a priority for homeowners and contractors alike. State-of-the-art Solutions to Embrace Several modern solutions have emerged, designed to contain dust effectively while maintaining an aesthetic appeal. From top-notch vacuum systems integrated into power tools to portable containment units, the variety of options means that homeowners can find a solution that fits their needs and budgets. Integrated Systems for Enhanced Efficiency Incorporating dust containment systems into construction processes is not just about keeping spaces clean; it’s also about enhancing the efficiency of work. New models feature dual filtration technologies and automated systems that monitor and adjust based on project needs. This ensures optimal dust capture while minimizing interruptions to workflow. Choosing the Right Equipment When selecting a dust containment system, consider the scale of your project. For smaller tasks, a handheld vacuum may suffice, whereas larger projects might require extensive systems that connect directly to tools. Features to look for include: HEPA Filters: Capable of trapping tiny particles, ensuring cleaner air quality. Noise Levels: Opt for quieter models to maintain a peaceful home environment during renovations. Portability: Systems that are easy to move can help keep dust management flexible on-site. The Cost-Benefit Analysis Investing in quality dust containment solutions may seem daunting initially, but the long-term benefits often outweigh the costs. Reducing cleanup time, preserving indoor air quality, and potentially increasing property value through better-maintained outdoor spaces are factors to consider. Environmental Benefits of Dust Control Beyond personal health, dust containment contributes positively to the environment. By preventing dust from escaping into the air, homeowners play a part in reducing air pollution during construction. This aspect resonates especially with eco-conscious homeowners, linking renovation practices with sustainability goals. Future Trends in Dust Management Looking ahead, the dust containment field is poised for innovation. With the advent of smart technology, future dust control systems may feature sensors that automatically adjust filtration power based on air quality readings, providing even more effective containment. Homeowners should stay informed about these emerging technologies to make educated decisions for their projects. Embracing Innovation for a Cleaner Space The right dust containment system not only keeps your renovation clean but enhances the overall satisfaction of the project. As a homeowner, learning about these options is vital in ensuring successful home upgrades. For homeowners looking to enhance their exterior upgrades—whether a landscaping project, an outdoor living space, or smart home installations—understanding dust containment solutions can significantly improve the quality of your project execution. Taking the plunge into smarter technologies for better dust containment could be your next step towards a cleaner, safer home environment.

Terms of Service

Privacy Policy

Core Modal Title

Sorry, no results found

You Might Find These Articles Interesting

T
Please Check Your Email
We Will Be Following Up Shortly
*
*
*