Add Row
Add Element
HOME SERVICE HUB
Add Element
  • Home
  • Categories
    • Smart Home Solutions
    • Gardening
    • Landscaping
    • Home Exterior
    • Outdoor Living
    • Smart Homes
    • Lawncare
    • Lighting Solutions
    • Plumbing Tips
  • Featured Business Profiles
April 03.2025
3 Minutes Read

Transform Your Garden with Vibrant Strawflowers: A Complete Guide

Delicate pink strawflowers blooming in a garden, sunny day.

Discover the Beauty of Strawflowers: The Perfect Addition to Your Garden

If you’re looking for an eye-catching flower that brings a splash of color to your garden while also serving as a durable dried decoration, look no further than strawflowers! Also known as everlasting daisies or paper daisies, these resilient blooms are not only visually appealing but also low maintenance, making them an excellent choice for homeowners eager to enhance their garden space.

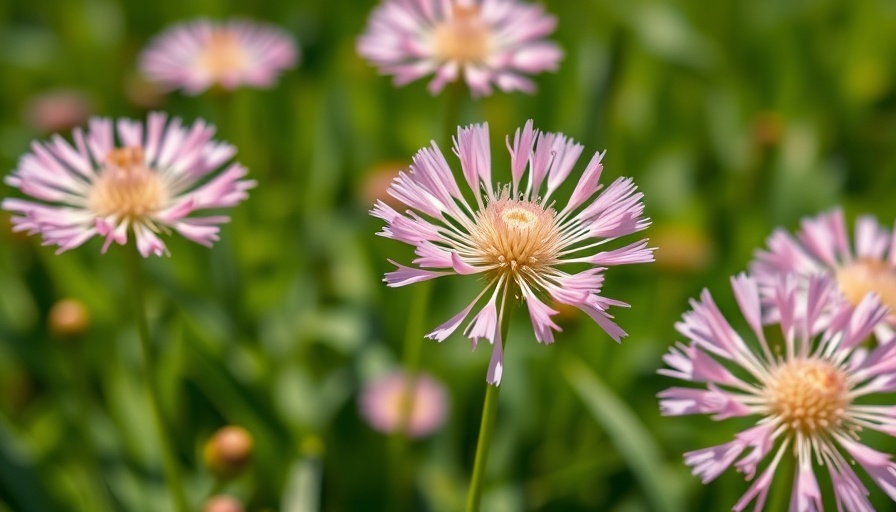
What Are Strawflowers?

Strawflowers (Bracteantha bracteata) are a member of the Asteraceae family, hailing from Australia. Their durable papery petals and vibrant colors—spanning from sunny yellows and oranges to deep reds and lovely pinks—make them a sought-after plant for gardens and cut flower arrangements alike. When cut at just the right time, strawflowers can retain their beauty for months, allowing you to decorate your home with a touch of nature during the colder months. When harvested correctly, they make stunning arrangements that can brighten any space.

Where and How to Grow Strawflowers

These hardy flowers thrive in full sun, requiring six to eight hours of direct sunlight daily, and they prefer well-drained soil. Interestingly, strawflowers are quite drought tolerant, meaning they require less water than many other flowering plants, making them ideal for a low-maintenance garden. Whether in raised beds, traditional flower gardens, or mixed in with veg, strawflowers flourish and add charm to any garden setup.

For best results, plant your strawflowers in a location that offers both sunlight and good drainage. For those in the colder climates, these flowers also have the advantage of being cold-tolerant and can withstand light frosts, extending their blooming season well into fall.

Starting Off with Seeds: An Easy Guide

For homeowners interested in growing strawflowers, starting them from seed is an easy and rewarding process. Begin by sowing seeds indoors approximately six weeks before the last frost date in your area. Use a seed-starting tray filled with a soilless mix, ensuring to keep the soil moist but not soggy. As your seedlings grow a few inches tall, transplant them outdoors after the threat of frost has passed.

You can also choose to direct sow the seeds into garden beds or container gardens when the weather warms up. Maintaining adequate soil moisture during germination is critical, and planting them a few inches apart allows each plant to thrive without overcrowding.

The Art of Harvesting Strawflowers

Timing is crucial when it comes to harvesting strawflowers for drying. You'll know they're ready when only a few bracts are open, while the center bracts remain closed, indicating that they are at their peak for drying. Promptly cut and hang them upside down in a dark, dry place to ensure they retain their vibrant color and form.

Consider clustering different colored strawflowers to create a striking visual impact in your dried arrangements. They can be used to create beautiful decorations for holidays, special events, or simply to add a touch of nature to your home décor.

Why Strawflowers Are Perfect for Homeowners

For homeowners focusing on outdoor living and landscaping, integrating strawflowers into your garden setup offers numerous benefits. Their stunning visual appeal, combined with their low maintenance nature, means less work and more beauty in your garden. Additionally, they encourage local pollinators, supporting a vibrant ecosystem within your yard.

The versatility of strawflowers also extends to their use in interior decorating. Once dried, they can add a unique, rustic charm to vases, wreaths, or floral arrangements displayed around your home, becoming focal points that showcase your gardening achievements.

Conclusion: Embrace the Beauty of Strawflowers Today

As you consider options to boost your garden's appeal this season, don't overlook the charm and practicality of strawflowers. From their vibrant blooms to their dried durability, they present a terrific, versatile addition to any homeowner's garden. If you’re ready to get started, gather your seeds and begin your strawflower journey today!

Landscaping

11 Views

0 Comments

Write A Comment

*
*
Related Posts All Posts
10.20.2025

Unlock the Secrets of When to Harvest Spaghetti Squash for Best Flavor

Update Choosing the Right Time to Harvest Spaghetti Squash Harvesting spaghetti squash at the right time can significantly impact the flavor and texture of your meals. Many home gardeners, particularly in the warmer regions of the U.S., might wonder exactly when to pick these unique fruits. Unlike other squashes, timing is critical when harvesting spaghetti squash, as this long-season crop needs adequate time to mature. Most varieties take approximately 85 to 90 days from the planting of seeds to harvesting, but this can vary slightly based on specific environmental conditions. The first step is to keep a vigilant eye on the calendar and frost dates to ensure your squash is harvest-ready before any cold weather hits. Signs of Maturity: What to Look For While calendar timing is essential, visual cues are just as critical when determining the right time to harvest spaghetti squash. There are several key indicators:1. Rind Color and Texture: The squash should have a smooth, creamy-yellow rind. It typically transitions from green to a pale yellow or cream by harvest time.2. Size and Weight: When ripe, spaghetti squash feels heavy for its size. It’s a good idea to consult information on your specific variety, as weights can differ. Generally, expect mature squash to be between 1.5 and 5 pounds.3. Stem Condition: Check the stem of the squash—if it has dried out and turned brown, it's a sign that the fruit is ready for harvest. If the stem is still green, the squash might need more time. The Art of Harvesting Spaghetti Squash Once you’ve determined your spaghetti squash is ripe, it's time to harvest. Utilize sharp shears to cut the stem while leaving about two inches attached to the squash. This helps protect the fruit from pests and environmental harm. Avoid pulling the squash from the vine, as this can bruise the skin and reduce its shelf life. After cutting, dry the squash gently if wet, but refrain from washing it, as moisture can lead to rot. Curing and Storing for Optimal Flavor To enhance both flavor and longevity, curing spaghetti squash is essential. This practice not only improves the taste but can also extend the storage time, which is critical for enjoying your harvest through the colder months. Curing should take place in a warm environment (around 80-85°F) with high humidity for about 10 days. A small greenhouse or a reasonably warm closet can work effectively for this process. After curing, store your squash in a cool, dry space—ideally between 50-60°F—to maximize freshness. Under the right conditions, well-cured squash can last for several months, allowing you to enjoy this garden bounty long after the growing season ends. Making the Most of Your Spaghetti Squash Harvest Many home gardeners enjoy the versatility of spaghetti squash, particularly as a gluten-free alternative to traditional pasta. As you plan your meals, consider trying out various recipes, from classic pasta dishes to innovative salads or casseroles. This squash not only adds a unique texture to meals but also offers a nutritious option for the health-conscious cook. Conclusion Knowing when to harvest spaghetti squash is vital for ensuring the best possible culinary experience. By combining calendar awareness with keen observation of maturity signs, you can maximize the quality and longevity of your squash. Cure and store them properly, and you will be rewarded with flavorful, homegrown pasta substitutes well into winter. Ready to dive deeper into gardening and food storage? Join local gardening groups, attend workshops, or explore additional resources online—the journey of self-sufficiency awaits!

10.17.2025

Unlock Winter Gardening Secrets: Can Tomato Plants Survive Winter?

Update Can Tomato Plants Survive Winter? Absolutely! For many gardeners, the notion of keeping tomato plants alive in winter brings a mixture of hope and confusion. Tomatoes, known for their vibrant colors and delicious flavors, thrive in warm conditions but are typically not frost-tolerant. However, with a bit of planning and care, it is indeed possible to overwinter these beloved plants and enjoy their yields year after year. Understanding the Lifecycle of Tomato Plants Tomatoes are classified as perennials in their native habitat, South America, where they can survive in a temperate climate. However, the cultivated varieties commonly found in home gardens tend to be less durable in cold weather. They thrive in warm, sunny environments and can suffer significantly when temperatures drop below 10°C. Therefore, to successfully overwinter tomatoes, gardeners must ensure their plants are healthy and provide suitable conditions for winter survival. Four Effective Techniques to Overwinter Tomato Plants Here are four practical methods to keep your tomatoes thriving through winter: 1. Bringing Tomatoes Indoors One of the most straightforward techniques is to bring your tomato plants inside. This is particularly effective for dwarf and micro varieties, which can flourish as houseplants during the colder months. Make sure to provide ample sunlight—ideally supplemented with grow lights—so they don’t become spindly or unhealthy. Regular monitoring for pests is crucial, as indoor plants can become targets for unwanted guests. 2. Utilizing a Greenhouse If you have a greenhouse, it can serve as an ideal location for overwintering your tomato plants. By maintaining above-freezing temperatures and ensuring adequate light, your tomatoes can comfortably produce fruit even during winter. Regular watering and occasional fertilization will support their growth. However, if you want to encourage fruit production, slightly higher temperatures might be necessary. 3. Propagating from Cuttings An exciting method to ensure the survival of your tomatoes is by taking cuttings before the first frost. Trim healthy stems to about 4-6 inches and place them in water to root. This method is space-efficient, as you can keep cuttings on a sunny windowsill. As roots develop, they can be potted and nurtured until ready to plant outside again in spring. 4. Bare-Root Dormancy This traditional method involves uprooting your tomato plants before frost and keeping them in a dormant state without soil. Wrap the roots in damp newspaper and store them in a cool, dark environment. Regularly check moisture levels to ensure they don't dry out. Upon the arrival of spring, these plants can be potted or directly planted into the garden, often resulting in an earlier harvest. Timing is Everything Regardless of the method you choose, timing is crucial. Begin your overwintering preparation about four weeks before the expected frost. Watch your local weather closely: an unexpected frost can decimate your plants if you wait too long. The Reward of Overwintering Overwintering tomato plants not only allows you to save your favorite varieties but also gives you a head start for the next growing season. Imagine the satisfaction of watching your beloved tomatoes flourish once the warmer weather arrives. By taking proactive steps now, you can enjoy an extended growing season and potentially greater yields from your garden. Feel Inspired to Save Your Tomatoes? With these techniques, anyone with a passion for gardening can conquer the challenges of winter. If you've found these methods helpful and exciting, why not dive deeper into your gardening journey? Explore our extensive gardening resources and connect with fellow enthusiasts to share your experiences and techniques. Happy gardening!

10.14.2025

Fall Gardening Guide: Why You Need to Plant Garlic in October

Update Why Plant Garlic in the Fall? Discover the BenefitsGarlic isn’t just another vegetable; it's a winter warrior ready to be harvested during the sunny days of summer. While many plants retreat during the colder months, garlic takes its time, rooting into the soil as the temperatures drop. The magic lies in its growing cycle, making fall the perfect season to plant garlic for a bountiful harvest the following summer.The fall planting of garlic allows it to develop a robust root system before the ground freezes solid. By planting in late October or early November, you’re giving your garlic a head start to thrive in spring.Essential Tips for Garlic Planting SuccessFor those considering diving into garlic cultivation, a few foundational strategies can pave the way to a plentiful harvest. Here are expert-backed tips to ensure your garlic bulbs reach their maximum potential:1. Timing is EverythingThe biggest rule of thumb is to get the garlic in the ground about 4 to 6 weeks before the first frost. This typically falls between late October and early November. Each region boasts its microclimates, so it is crucial to adjust this timing according to local weather patterns. Garlic planted at the appropriate time will be one of the first crops to emerge when spring arrives.2. Site Preparation: The Foundation of GrowthGarlic flourishes in organic-rich, well-draining soil that’s allowed to bask in sunlight. For best results, consider enriching your gardening bed with 2 to 3 inches of compost before planting. This nutrients boost creates an environment of fertility that marries well with garlic’s growth requirements, ensuring your bulbs become as impressive as possible.And remember, while ideal conditions matter, garlic is surprisingly forgiving. Even if your soil isn’t perfect, with the right amendments, it can still produce vibrant crops.3. Correct Planting Depth and SpacingWhen planting your garlic cloves, spacing matters. Each clove should be planted approximately 6 inches apart in rows that are about 10-12 inches apart. This spacing prevents overcrowding, which can lead to undersized bulbs. Also, plant cloves with the pointed end facing upwards and submerged 2-3 inches into the soil; too deep and they may struggle, too shallow and they can perish in the rough winter climate.4. Mulching: The Protective LayerAfter planting, mulching your garlic bed is essential for winter protection. A 3 to 6-inch layer of mulch, made from straw or shredded leaves, retains moisture while insulating the soil. This mulch acts as a buffer against frost, ensuring the cloves remain healthy until spring. Wait until consistently cool weather arrives before adding this layer to your garlic beds.Understanding Different Varieties of GarlicGarlic comes in two main types: hardneck and softneck, and understanding the difference can enhance your gardening experience. Hardneck varieties thrive in cooler climates, offering robust flavors and the added bonus of delicious scapes, while softneck garlic tends to flourish in warmer regions and boasts a longer shelf life.If you’re new to garlic cultivation, consider starting with hardneck garlic if your region supports it. These types not only produce larger bulbs but also provide edible scapes that can be enjoyed in various dishes.Common Misconceptions and MythsOne common myth surrounding garlic planting is that grocery store garlic can be used as seed. While it can be tempting, commercially sold garlic is often treated with inhibitors to prevent sprouting. Instead, consider purchasing quality seed garlic from a reliable source to ensure your bulbs thrive once planted.Conclusion: Time to Get Your Garlic InNow that you are armed with the know-how and insights for planting garlic this fall, get out there and put those cloves in the ground! The rewards will not only bring flavorful additions to your kitchen but also the joy of cultivating your own food. Ensure you’re set up for success; vibrant garlic bulbs await you in the summer sunshine!Planning to add garlic to your garden this October? Don’t wait—take action today and dive into the world of home gardening!

Terms of Service

Privacy Policy

Core Modal Title

Sorry, no results found

You Might Find These Articles Interesting

T
Please Check Your Email
We Will Be Following Up Shortly
*
*
*